Stem Fitting
Apex / Apex35
Equipment required – Torque Wrench, 4mm Hex Socket Bit, Waterproof Grease.
Important - Follow all fitting instructions in order
Steerer tube preparation
- The Renthal Apex stem requires a 28.6mm (1 1/8”) steerer tube (check prior to installation).
- Ensure the steerer tube is the correct length – no more than a 3mm gap from the top of the stem to the top of the steerer tube (Fig. 1). If the steerer tube requires modifying to fit, ensure it is cut level.
- Ensure all sharp edges and burrs are removed from the steerer tube and the external surface is both clean and dry.
Installation
- Remove all screws. Grease the threads and under the heads.
- Slide the stem onto the steerer, either way up depending on the rise spec required. Fit the top-cap and tighten the pre-load screw to the manufacturer’s specified torque.
- Place one of the gold handlebar clamps over the narrow section of your handlebar (Fig. 2) and slide to the centre, ensuring the ‘Lower Clamp – No Gap’ marking is at the underside of the bar and facing outwards. If your handlebar has a logo, use the gap in the clamp to avoid marking it. Repeat with the second clamp (Fig. 3).
- Hold the handlebar against the stem body and rotate the first clamp until the lower section contacts the stem (Fig. 4). Insert the screw and tighten until finger tight. Repeat with the second clamp.
- Insert the two upper handlebar clamp screws and thread in 3-4 turns.
- Tighten both lower clamp screws to 5Nm (Fig. 5).
- Centre the handlebar and set your required angle. Tighten the two upper handlebar clamp screws to 5Nm (Fig. 6).
- Insert the steerer clamp screws, align the stem and tighten to 5Nm (Fig. 7).
 Fig 1.
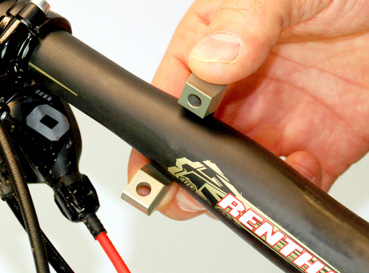 Fig 2.
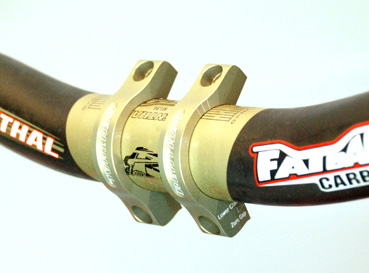 Fig 3.
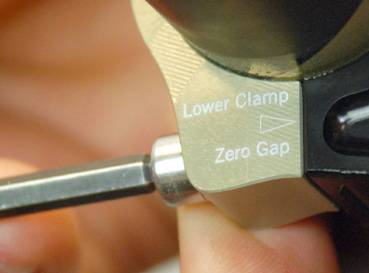 Fig 4.
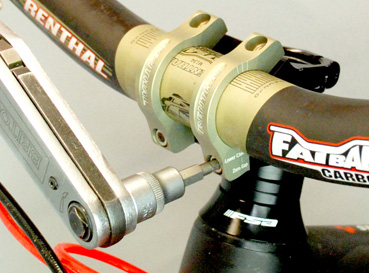 Fig 5.
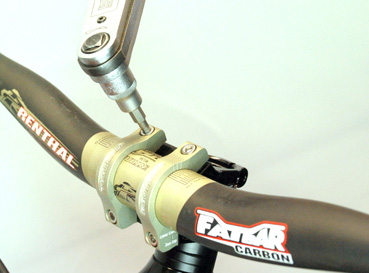 Fig 6.
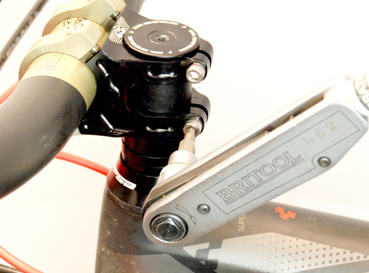 Fig 7.
Integra / Integra35
Equipment required – Torque wrench, 4mm hex socket, waterproof grease.
Important - Follow all fitting instructions in order
Handlebar compatibility - The central clamping area of the handlebar must have a straight section with a minimum width of 64mm. If in doubt, consult your cycle dealer.
Installation
- Remove all screws from the stem and discard the plastic retention washers. Grease the threads of all screws before re-installing.
- Insert the shortest M6 bolts through the rear mount holes of stem body and thread into the rear mount holes of the fork top crown. Tighten until finger tight
- With ‘Zero Gap’ marks facing out and horizontal, place the gold clamps over the smaller, 22.2mm diameter outer section of the handlebar and slide in towards the central clamping area
- Insert the longest M6 bolts through the handlebar clamps, through the forward holes of the stem body and thread into the forward mount holes of the fork top crown. Tighten until finger tight
- Insert the M5 bolts into the handlebar clamps and tighten until finger tight
- Alternating between each M6 bolt, progressively tighten to a torque of 10Nm
- Align and rotate your handlebar into position and tighten the M5 handlebar clamp bolts to 6Nm
Maintenance
- Before each ride, ensure all bolts are tightened to the correct torque
- Periodically inspect all parts for signs of damage, especially in the event of a crash
- Clean and re-grease all bolts if disassembling and re-assembling the stem
Warning
- This product must be fitted by a qualified mechanic
- Do not use this product following a crash, or if the product is damaged in any way
Duo
Equipment required – Torque Wrench, 4mm Hex Socket Bit, Waterproof Grease.
Important - Follow all fitting instructions in order
Steerer tube preparation
- 1. The DUO™ Stem is designed to work only with 28.6mm (1 1/8") steerer tubes (check prior to installation).
- 2. Ensure the steerer tube is set to the correct length - leave no more than a 3mm gap from the top of the stem to the top surface of the steerer tube (if the steerer tube requires modifying to fit, ensure it is cut level).
- 3. Ensure all sharp edges and burrs are removed from the top of the steerer tube (both inside and out).
- 4. Ensure that the steerer tube and stem are both clean and dry.
Installation
- Remove all bolts, apply grease to the threads and under the heads of the bolts.
- Place the handlebar in the stem (in the correct orientation) and loosely assemble the two central SILVER bolts. (Fig. 1).
- Slide the stem onto the steerer tube until it contacts the headset spacer(s) and then tighten the two central SILVER bolts to 5Nm.
- Install the top cap onto the top of the stem, then tighten to the manufacturer’s specification.
- Align the handlebar with the front wheel and install two BLACK bolts into the rear of the stem. Alternating between the two bolts, progressively tighten to 5Nm, to ensure even clamping. (Fig. 2).
- Install the remaining two BLACK bolts into the front of the stem, align the handlebar to the desired position, and alternating between the two, progressively tighten to 5Nm, to ensure even clamping. (Fig. 3).
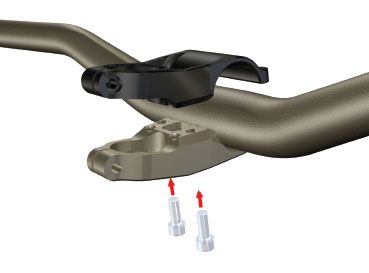 Fig 1.
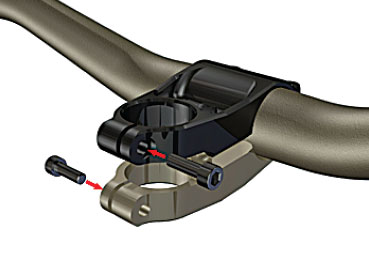 Fig 2.
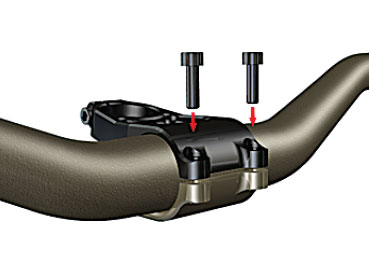 Fig 3.