Grip Fitting - Cycle
Single Collar Lock-On
Equipment required – Torque Wrench, 2.5mm Hex Socket Bit, Waterproof Grease.
Important - Follow all fitting instructions in order
Installation
- Clean handlebar surface before fitting
- Identify the Left and Right grips, using the L and R on the grip
- Slide the correct side grip onto the handlebar. Ensure the locking screw is on the underside of the handlebar
- As the grip reaches the end of the handlebar there will be an increase in resistance. Keep sliding the grip until it reaches a hard stop
- Grease under the heads and threads of the screws
- Tighten the screws to 3Nm maximum
- Re-check the torque setting after 2 hours of riding
Important Safety Information
- This product must be fitted by a qualified mechanic
- Do not use this product following a crash, or if the product is damaged or marked in any way
- Never exceed 3Nm torque - This will result in stripping the threads
- Replace the grip if it becomes damaged
- Please retain packaging for future reference
- Failure to comply with the warnings and installation instructions can result in complete product failure.
Lock-On
Equipment required – Torque Wrench, 2.5mm Hex Socket Bit, Waterproof Grease.
Important - Follow all fitting instructions in order
Installation
- Clean handlebar surface before fitting
- Slide the grip onto the handlebar, ensure both collars are in contact with the handlebar
- Grease under the heads and threads of the screws
- Tighten the screws to 2Nm maximum
- Re-check the torque setting after 2 hours of riding
Important Safety Information
- It is essential that both inner and outer collars are tightened onto the handlebar
- Never exceed 2Nm torque - This will result in stripping the threads
- Replace the grip if it becomes damaged
Traction Lock-On
Equipment required – Torque Wrench, 2.5mm Hex Socket Bit, Waterproof Grease.
Important - Follow all fitting instructions in order
Installation
- Clean handlebar surface before fitting
- Orientate the grip so the FORWARD arrow is pointing forwards
- Slide the grip onto the handlebar, ensure both collars are in contact with the handlebar
- Grease under the heads and threads of the screws
- Rotate the grip so the word TOP is at the top of the handlebar
- Tighten the screws to 2Nm maximum
- Re-check the torque setting after 2 hours of riding
Important Safety Information
- It is essential that both inner and outer collars are tightened onto the handlebar
- Never exceed 2Nm torque - This will result in stripping the threads
- Replace the grip if it becomes damaged
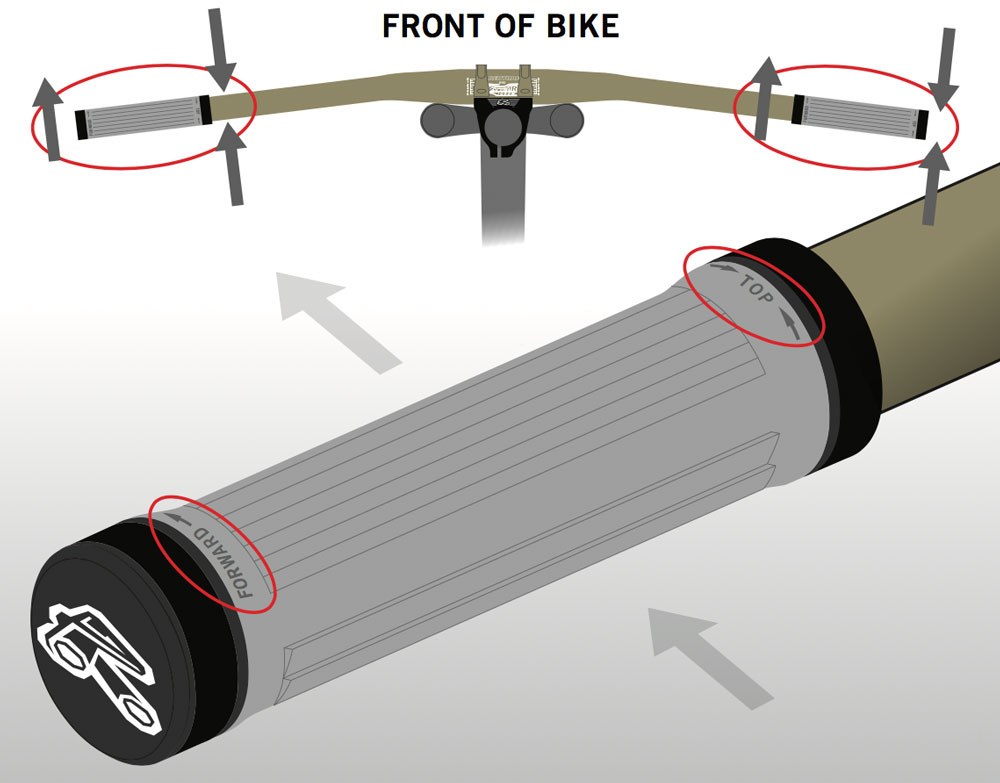 Fig 1.
Push-On
Equipment required – Grip Glue
Important - Follow all fitting instructions in order, for best results use Renthal Grip Glue.
Installation
- Clean and dry the handlebar surface
- Apply glue generously to the handlebar and inside the grip
- Install grips immediately, rotating the grip as you slide it into position
- Allow glue to dry for specified duration before use
- Install the supplied end plugs
Important Safety Information
- Do not use contact cleaner, petrol or any solvent inside the grips.
- A small amount may be added to the handlebar to aid fitting.
- Never use paint or thinners.